
Google reviews help with just about everything when it comes to getting more patients.
If someone hears about you from a friend, they’ll look you up on Google to see your reviews. If they see you from an ad, they’ll look up your Google reviews to see how good you are. If they’re looking for services you provide, having more (and more recent) Google reviews helps you stand out more from your competitors and show up at the top of search results.
If you’d rather watch a video, check it out here. Otherwise, keep scrolling for the article.
So, what are the ways to get more?
Fundamentally, what you’re doing to get more reviews is: asking and reminding them to leave you a review.
As long as they like you and you helped them, they’re likely to leave you a review if they remember.
So, you could do things like send an email/text blast, set up automated emails, call people to ask them, ask them before/during/after an appointment, text or email them personally, etc.
Texting or emailing them personally to ask for a review tends to work best, but it takes a lot of time. (Note: Automated methods don’t work as well. Personal touches that take effort get noticed the most and work best.) If you have the time, then this works great.
Otherwise, there’s a more automated method:
A review board.
Of all the automated methods to get reviews I’ve tested with clients, this one works the best.
Here’s what it looks like:

The important part is that it is handwritten. I’ve tested printed poster boards and they simply don’t work as well. People start to ignore it after a week, whereas a handwritten board can go strong for well over a year.
There have been psychological studies that show when you put in extra effort to handwrite stuff, it becomes more noticeable and people are more likely to do what you ask. That’s why we go with the personal, handwritten board over a printed poster. 1
From my testing with clients, you can usually expect to get (on average) a review a week from this method. This, of course, depends on how many patients you see, what percentage of those patients have already left you a review, how many of them see the sign, etc.
How to create one
1. Make sure you have your Google Business Profile claimed
If you already have your Google Business Profile set up and claimed, you can skip this part.
If your business is already set up on Google and you just need to claim it, then:
- Search your business on Google
- Click Claim this business > Manage now
- Select a verification option and then follow the on-screen instructions
Usually, it will ask you to verify your business via a verification code texted or called to your business number.
If your business is not yet set up on Google, then you can add it by:
- Going to Google Maps.
- Right clicking anywhere on the map.
- Clicking Add your business.
- Then following the instructions.
Here is the documentation from Google showing these steps. It may be more up-to-date than my instructions.
2. Get a chalkboard and chalk
All these are links to Amazon (none of them are affiliate links).
Here’s the model that’s in the picture.
It comes with a white chalk marker, but if you want more colors, here’s the chalk markers I used for the other colors.
You’ll also want magnets to hang up your QR code.
You can use any kind of chalkboard you want—just make sure it’s magnetic.
Whiteboards may work too, but I find that chalkboards are much more unique. (You don’t see many chalkboards anymore!) Since we want this to stand out so people will leave reviews, I would recommend going with a chalkboard.
3. Find your Google review link
Go to your Google Business Profile. You can do this by searching “my business” on Google, then clicking your profile that shows up.
Here are some other ways to find your Google Business Profile.
From there, you can either click the Ask for reviews button, or (if that doesn’t show up), click Read reviews > Get more reviews.
Copy the link that shows up.
You can use this link to send to people via email, text, etc. For this review board, however, we’re going to turn it into a QR code that people can scan to leave us a review.
4. Turn the Google review link into a QR code
There are lots of QR code generators on the internet. The one I use is:
https://www.qr-code-generator.com
If you don’t want to use it, just look up “QR code generator” and find one you like. They all function pretty similarly.
Once you are on the website, you’ll click the URL button in the top left of the entry box to ensure it’s on the right setting. It should do this automatically for you, but if you’d like to be safe, then click the button.
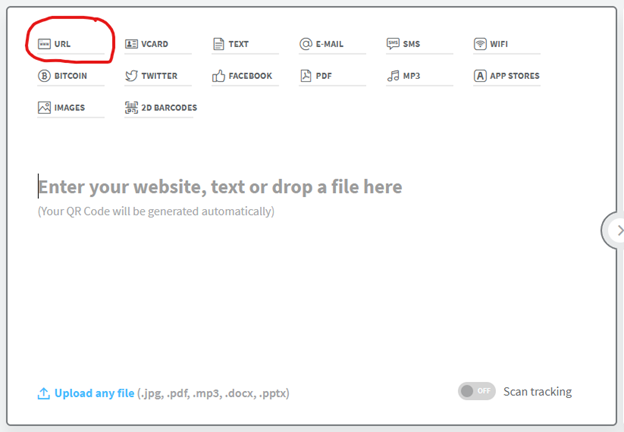
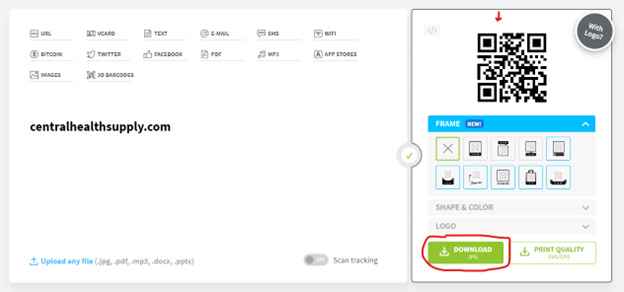
Next, paste your link into the textbox.

A QR code will show up. You can then click the Download JPG button.
That’s the quick version. The instructions are also on the website if you scroll down.
If you want to use any of the other extra features, it will require you to create an account and go through extra steps. As of the time of writing this, these steps are the fastest way to get your QR code set up.
After you’ve got your QR code, you’ll print it out.
I’d recommend pasting it into a Word document so you can format it to the right size to fit on your chalkboard. As long as your zoom is set to 100% on Word, it tends to be pretty close to the size of a piece of printer paper.
From there, you can save your Word doc and then print it out. You can fold up your paper to the right size or trim the paper down. It’s up to you. Just make sure to leave a little white space to hang the paper by so the magnet doesn’t get in the way of the QR code.
5. Put it all together
The text that seems to work the best is the one on the picture. I’ve copied the picture below and put the words in plain text in this document to make it easy to reproduce.
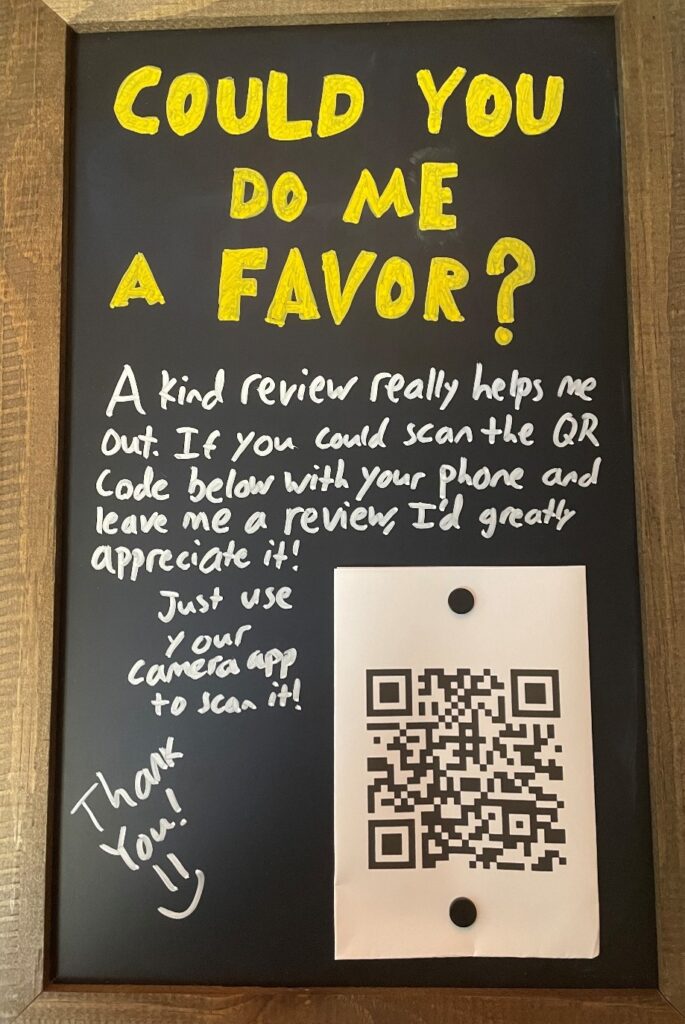
The headline is put in a different color than the rest of it. You don’t have to do that, but I think it makes it stick out more (which is the goal). Here’s the text:
| Can You Do Me a Favor? A kind review really helps me out. If you could scan the QR code below with your phone and leave me a review, I’d greatly appreciate it! Just use your camera app to scan it! Thank you! 🙂 |
If there are more people in your clinic than just you, you can adjust the language as necessary to make it plural.
In the bottom right corner, hang up your printed out QR code with magnets.
6. Set out your new review board!
After that, you’re done! The only thing left to do is to put it in a place where everyone will see it.
I recommend putting it up at your front desk, but you’ll know where everyone in your clinic is more likely to see it. So, put it there. You can always move it if your guess turns out wrong.
If you’d like more help with the business side of things, check out the ways we can help here.
1. Garner, R (2005). Post-It® Note persuasion: a sticky influence. Journal of Consumer Psychology, 15:230-37